
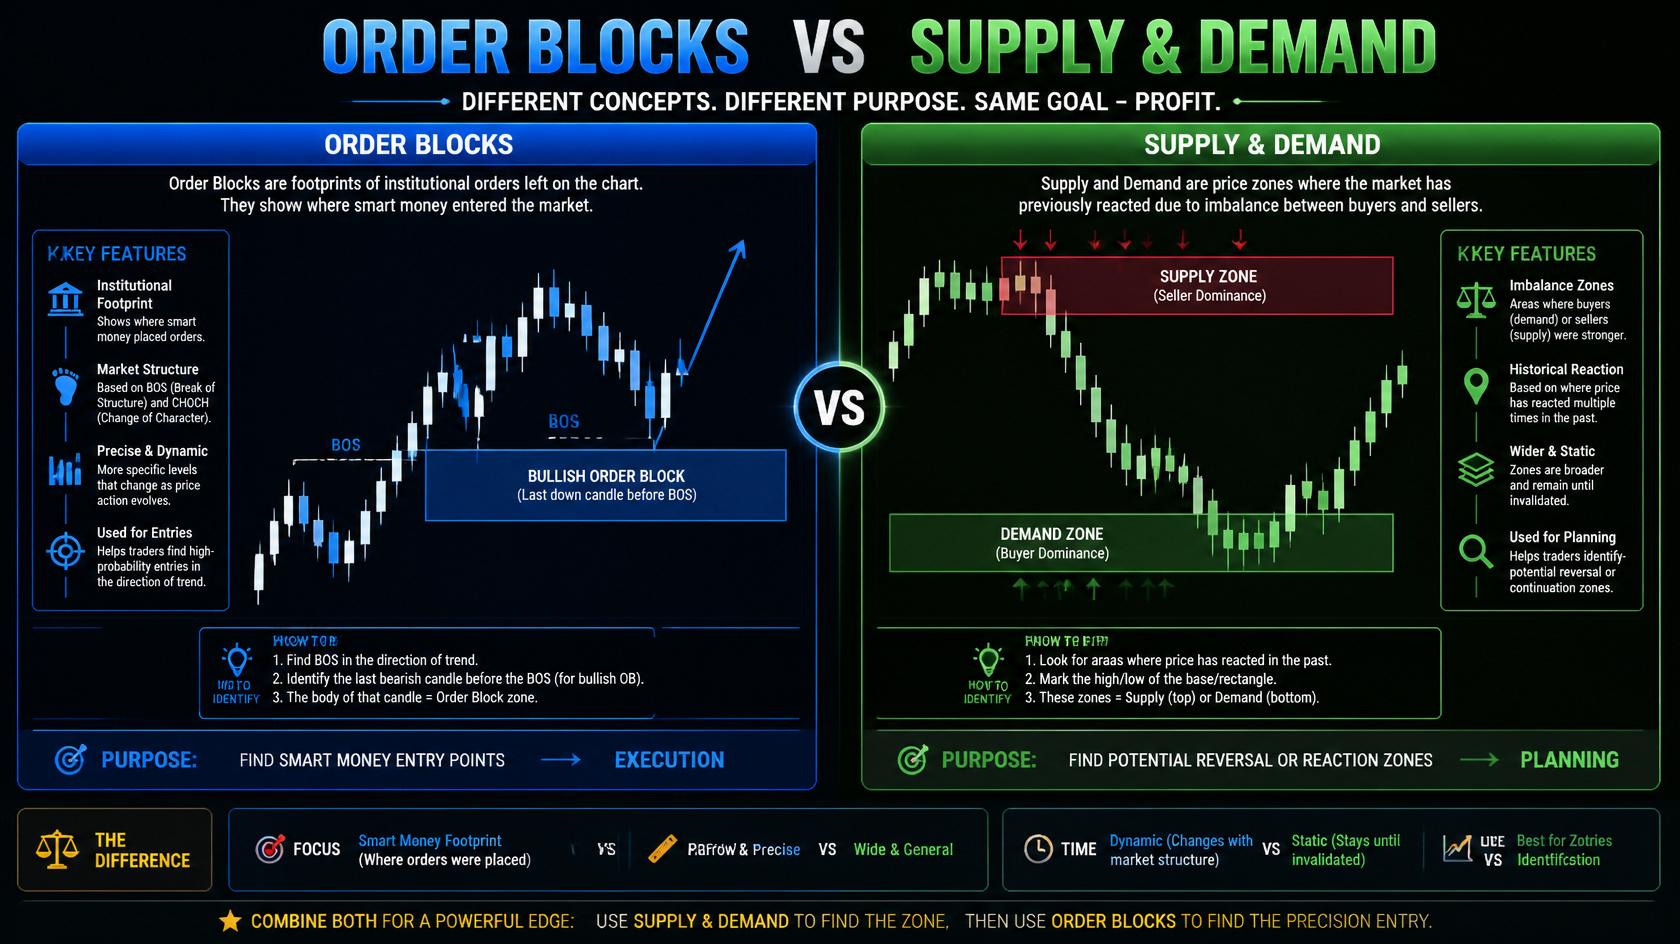
When price returns to certain areas on a chart, traders often expect the market to react. One reason is that significant buying or selling activity may have taken place there previously. This idea forms the foundation of both Order Block and Supply and Demand trading strategies.
Order Blocks have become particularly popular among traders who follow Smart Money Concepts because they attempt to identify areas where large market participants may have entered positions. Supply and Demand analysis takes a broader approach by looking for areas where strong buying or selling pressure created a noticeable imbalance.
Although both methods can identify potentially important price zones, they approach the market from slightly different perspectives.
Understanding Supply and Demand Zones
Supply and Demand trading focuses on areas where buying or selling pressure previously caused a strong price movement.
A Supply Zone forms where selling pressure became strong enough to push prices lower.
A Demand Zone develops where buyers gained control and drove prices higher.
The main idea is that these areas represent an imbalance between buyers and sellers. When price returns to a strong zone, traders watch for another potential reaction.
Supply and Demand analysis can be applied to almost any financial market, including stocks, forex, commodities, indices, and cryptocurrencies.
The Main Difference Between Order Blocks and Supply and Demand
Order Blocks and Supply and Demand zones can sometimes appear in similar locations, but their underlying concepts are different.
Order Block analysis focuses on specific price candles or areas that preceded a significant market move. Traders using this approach attempt to identify where institutional activity may have occurred.
Supply and Demand analysis generally focuses on broader areas where buying or selling pressure created a significant imbalance.
In simple terms, Order Blocks tend to be more specific, while Supply and Demand zones are generally broader and more flexible.
Many traders choose to combine the two approaches rather than treating them as completely separate strategies.
Why These Strategies Are Popular in 2026
Modern financial markets are heavily influenced by institutional investors, automated systems, and algorithmic trading.
Traditional indicators can sometimes react after a significant price move has already occurred. Price-action strategies such as Order Blocks and Supply and Demand attempt to give traders a closer look at how price behaves around important market areas.
Instead of depending entirely on lagging indicators, traders can use these concepts to analyze market structure, buying and selling pressure, and potential areas of institutional activity.
This has helped both strategies gain popularity among retail traders.
Accuracy and Precision
Order Blocks are often considered more precise because traders focus on specific candles or smaller areas associated with significant market movements.
This can allow traders to define more precise entries and potentially use tighter stop-loss levels.
Supply and Demand zones generally cover a larger price range. This can make them easier to identify but may also result in wider stop-loss placements.
The better approach depends on the trader’s strategy, risk tolerance, and ability to identify high-quality setups.
Which Strategy Is Easier to Learn?
For beginners, Supply and Demand is often easier to understand.
The basic concept is relatively straightforward: identify areas where buyers or sellers previously gained strong control and watch how price behaves when it returns.
Order Block analysis can require a deeper understanding of market structure, liquidity, price action, and Smart Money Concepts.
New traders may therefore need more practice before they can consistently identify meaningful Order Blocks.
With experience, however, Order Blocks can provide very detailed entry opportunities.
Performance in Trending Markets
Order Blocks can be particularly useful during strong market trends.
When a market is moving consistently in one direction, traders may look for an Order Block that aligns with the prevailing trend and wait for price to return to that area before considering an entry.
This can provide opportunities for trend-continuation trades.
Supply and Demand zones can also work well in trending markets, but traders may identify several zones along the way. Determining which zones are genuinely important becomes an important part of the strategy.
Performance in Ranging Markets
Supply and Demand can offer greater flexibility when the market is moving sideways.
During a range, price may repeatedly move between areas of buying and selling pressure. Traders can use these zones to identify potential opportunities near the boundaries of the range.
Order Blocks may be more difficult to interpret in choppy conditions because clear market structure and directional momentum may be missing.
Regardless of the strategy, understanding whether the market is trending or ranging is important before taking a trade.
Risk Management
Neither Order Blocks nor Supply and Demand can guarantee profitable trades.
Risk management remains one of the most important parts of any trading strategy.
Order Block traders may place their stop-loss beyond the relevant zone and target another important market structure or liquidity area.
Supply and Demand traders may also place stops outside the identified zone, giving price some room to move without immediately closing the trade.
Rather than focusing only on winning trades, traders should pay attention to position sizing and maintaining a reasonable risk-to-reward ratio.
Best Timeframes to Use
Both strategies can be applied across different timeframes.
Day traders may use five-minute or fifteen-minute charts to identify shorter-term opportunities.
Swing traders often focus on four-hour and daily charts to find larger market zones.
Longer-term traders may also analyze weekly charts to identify significant areas of accumulation and distribution.
Higher timeframes can provide a broader view of market structure and may reduce some of the noise found on lower-timeframe charts.
Combining Order Blocks With Supply and Demand
Traders do not necessarily have to choose between these two strategies.
Combining them can provide additional confirmation.
For example, a trader might identify a strong Demand Zone on a daily chart and then look for a bullish Order Block on a four-hour chart before considering an entry.
This type of multi-timeframe analysis can help traders narrow down potential setups.
Adding market structure, trend direction, and volume analysis can provide further context when evaluating a trade.
Common Mistakes Traders Make
One common mistake is marking too many zones on a chart.
Not every price movement creates a meaningful Order Block or Supply and Demand zone. Filling a chart with dozens of areas can make decision-making more difficult rather than easier.
Another mistake is ignoring the broader market trend.
Entering a trade simply because price reaches a zone can be risky if the overall market is moving strongly in the opposite direction.
Beginners may also enter positions without waiting for confirmation. Price action, volume, or a change in market structure can sometimes provide additional information before a trade is taken.
Patience and selectivity are important when using either strategy.
Which Strategy Works Better?
There is no universal answer.
The better strategy depends on the trader’s experience, goals, timeframe, and preferred style.
Order Blocks may appeal more to experienced traders who want precise entries and prefer analyzing institutional behavior and Smart Money Concepts.
Supply and Demand can be a simpler and more flexible starting point, particularly for beginners learning how market imbalances work.
Rather than choosing one exclusively, many traders combine both approaches to find stronger setups.
Future Outlook
As financial markets continue adopting artificial intelligence, automation, and algorithmic trading, understanding market structure and participant behavior is likely to remain important.
Strategies based on price action, liquidity, and market imbalances can remain useful because they focus on how markets behave rather than depending entirely on mathematical indicators.
For traders, the most important step is not simply choosing between Order Blocks and Supply and Demand. Developing a clear trading plan, practicing the strategy consistently, and maintaining disciplined risk management are ultimately more important than the name of the strategy being used.